

Payd provides you with payment infrastructure to receive payments and aggregate your income in one wallet. The Payd Woocommerce Plugin gives you the flexibility of integrating payments into your WordPress store, allowing you to make sales and receive the payments directly into your Payd wallet. Here is a quick guide on setting up the Payd plugin on WordPress;
Requirements
To be able to set up the plugin on WordPress, you need the following;
- A Payd wallet – create one HERE
- A WordPress site, version 5.6 and above (latest version recommended)
- The WooCommerce plugin installed and activated – Installation Guide
- A test product setup on WooCommerce – Product Setup Guide
1. Installing the Plugin
Download the plugin from the download button below. Go to your WordPress admin dashboard and select ‘Plugins’ on the left-hand side menu. On the plugins page, select ‘Add New Plugin’ then select ‘Upload Plugin’.

Select ‘Choose Files’ and select the plugin zip file from your downloads and click ‘Install Now’. Once the plugin is installed, click ‘Activate’ to activate the plugin.

2. Setting up Classic WooCommerce Checkout
Payd’s current plugin works exclusively with WooCommerce classic checkout. All new installation of WordPress come with blocks checkout – we are in the process of updating our plugin to work with blocks checkout.
To switch to classic checkout, select ‘Pages’ on the WordPress sidebar and go to ‘Add New Page’. Create a blank page named ‘Payd Checkout’ and publish. Open the page with your preferred page editor and add the ‘Classic Checkout’ widget or block under the WooCommerce blocks section – remember to save changes.
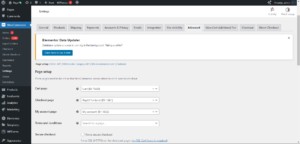
Once done, visit WooCommerce (on the WordPress sidebar) > Settings > Advanced and replace the checkout page with the new page you created. Click on save changes at the very bottom.
3. Generating API Keys on your Payd Dashboard
Log into your Payd wallet and select ‘My Account’ on the side menu. On mobile devices, click the hamburger icon on the top left to navigate to the side menu. Under my account, select ‘API Keys’ or the key icon at the top on mobile devices.
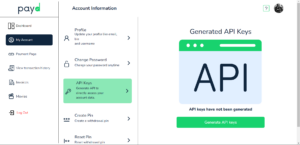
Click on the ‘Create Keys’ button and enter a short descriptive name for your API Keys. The name should not include spaces and special characters.
Click on ‘Generate’ to generate your API Key Username and Password. Copy and save these in a secure location as they will only be displayed once, and you will not be able to access them again. Do not share the keys with anyone.
4. Setting up Plugin Credentials
On the left-hand side menu, select ‘Settings’ under ‘WooCommerce’. On the settings menu, select ‘Payments’ at the top, then select ‘Finish Setup’ next to the Payd Payment Gateway.

Check the ‘Enable Payd Mobile Payments’ checkbox and customize the display name, description, and instructions as you would like them to be presented on your checkout page.

5. Adding API Keys to the Plugin
Paste the API Key Username and the API Key Password in the payment plugin setup area back on WooCommerce settings. Type in your Payd username, add the callback URL (https://yourwebsitedomain/wc-api/wc_payd_payment_gateway) and click ‘Save Changes’ at the very bottom.

You are all set! Attempt purchasing your test product. You should find Payd as a payment option on checkout. On the payment popup, select mobile or card. Under mobile, select the preferred mobile network, enter your phone number, and click checkout. You will receive an STK prompt to enter your pin and receive payments.
For further setup support, reach out to us at [email protected].